Vegan Cotton Candy Ice Cream Cake is a delightful dessert that captures the whimsical essence of cotton candy in a creamy, ice-cold cake form. Perfect for birthdays, summer gatherings, or any celebration, this cake will impress guests with its vibrant colors and delicious flavors. The combination of plant-based ingredients makes it suitable for vegans and those seeking a refreshing treat without dairy.
Why You’ll Love This Recipe
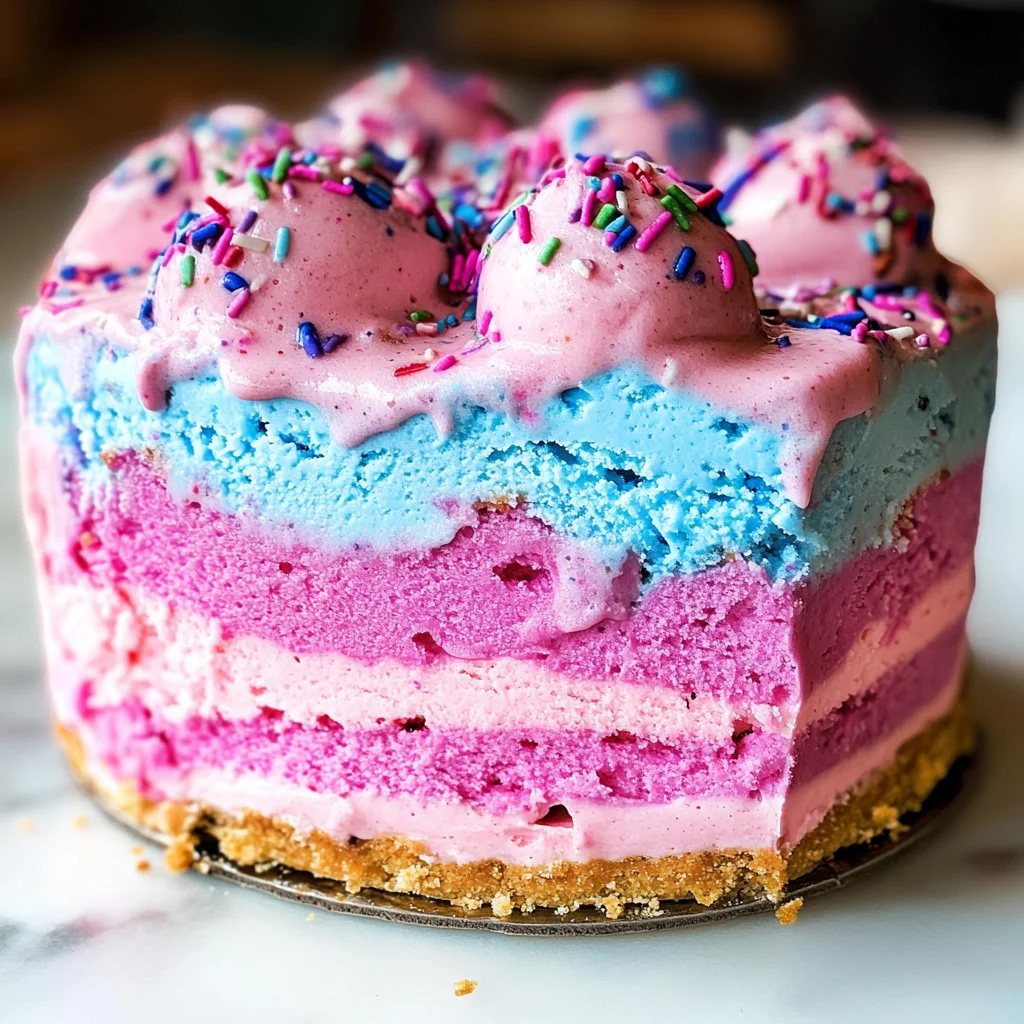
- Fun and Colorful: The vibrant layers of blue and pink mimic traditional cotton candy, making it an eye-catching centerpiece.
- Easy to Prepare: With simple steps and accessible ingredients, you can whip up this cake without hassle.
- Customizable Flavors: Feel free to experiment with different fruit purees or colors to create your own unique versions.
- Perfect for Any Occasion: Whether it’s a party or a family gathering, this cake fits right in at any celebration.
- Dairy-Free Delight: Made entirely from plant-based ingredients, it’s suitable for vegan diets and those with lactose intolerance.
Tools and Preparation
Before diving into the recipe, gather your tools to ensure a smooth baking experience.
Essential Tools and Equipment
- 6 inch round cake pan
- Mixing bowls
- Blender
- Measuring cups and spoons
- Spatula
Importance of Each Tool
- 6 inch round cake pan: Perfect for creating the ideal size for this layered cake.
- Blender: Essential for achieving a smooth mixture of dates and water.
- Spatula: Helps in spreading layers evenly and scraping mixing bowls clean.
Ingredients
To make your Vegan Cotton Candy Ice Cream Cake, you’ll need the following ingredients:
- 12 pitted Medjool dates
- 1 cup water
- 1 cup oat flour
- 1 tbsp baking powder
- 2 tbsp tapioca flour
- 1 tsp vanilla extract
- 1/4 cup unsweetened shredded coconut
- 2 tsps natural blue food coloring
- 2 tsps pitaya puree
- 1 1/2 cup So Delicious Creamy Cashew Cashewmilk Ice Cream
- 3-4 tbsps pitaya puree
- 2 cups Cocowhip OR 1 1/2 cup Cashewmilk Ice Cream
- 1 tbsp natural blue food coloring
- 2 cups Cocowhip
- 2 tbsps pitaya puree
How to Make Vegan Cotton Candy Ice Cream Cake
Step 1: Blend the Dates
Blend the water and pitted Medjool dates until smooth.
Step 2: Combine Ingredients
Transfer the date mixture to a large mixing bowl. Add oat flour, baking powder, tapioca flour, vanilla extract, shredded coconut, blue food coloring, and pitaya puree. Stir well to combine all ingredients.
Step 3: Prepare the Cake Pan
Lightly oil the inside of your 6-inch round cake pan. Fill it about two-thirds full with the batter you prepared.
Step 4: Bake the Cake
Bake in a preheated oven at 325°F for approximately 30–35 minutes. The center should bounce back when lightly touched.
Step 5: Cool Down
Once baked, allow the cake to cool completely before carefully slicing off the rounded top. Cut the cake into two layers horizontally.
Step 6: Color Your Coconut
Prepare colored coconut by mixing each color separately. Ensure that each batch is well-coated before spreading it in thin layers on plates. Leave out overnight to dry.
Step 7: Assemble Your Cake Layers
Use a springform pan for easy removal once frozen. Place one layer of cake at the bottom of the pan.
Step 8: Add Pink Ice Cream Layer
Mix up your pink ice cream layer using pitaya puree. Spread it evenly on top of the bottom cake layer. Freeze for about one hour.
Step 9: Add Blue Ice Cream Layer
Prepare your blue ice cream layer next. Spread it over the pink layer and freeze again for one hour.
Step 10: Top It Off with More Cake
Place your second layer of cake on top of the blue ice cream layer. You can add a thin layer of ice cream between layers for better adhesion if desired.
Step 11: Finish with Cocowhip Layer
Make your pink Cocowhip layer by mixing it thoroughly before spreading it generously on top of the entire cake.
Step 12: Decorate Your Cake
Top off your creation with dollops of pitaya puree swirled into the pink Cocowhip and sprinkle some fun toppings over everything!
Step 13: Freeze Overnight
Cover your assembled cake well and place it in the freezer overnight to set completely.
Step 14: Serve
Remove from freezer about ten to fifteen minutes before slicing. This allows easier cutting into perfect slices!
Step 15: Store Leftovers
Keep any leftover slices in the freezer for up to one week—if they last that long! Enjoy your delightful Vegan Cotton Candy Ice Cream Cake!
How to Serve Vegan Cotton Candy Ice Cream Cake
Serving your Vegan Cotton Candy Ice Cream Cake can be just as fun and creative as making it. Here are some delightful serving suggestions that will elevate your dessert experience.
For a Festive Event
- Use colorful plates and decorations to enhance the visual appeal.
- Pair with themed sprinkles or edible glitter for added flair.
With Fresh Fruits
- Serve slices with a side of fresh strawberries, blueberries, or bananas for a refreshing contrast.
- Consider a fruit compote to drizzle over the top for extra sweetness.
As Part of a Dessert Platter
- Cut into small squares and place on a large platter alongside other bite-sized desserts.
- Offer mini forks or toothpicks for easy serving at parties.
Accompanied by Non-Dairy Whipped Cream
- Add dollops of coconut whipped cream on the side for an extra creamy texture.
- Flavor the whipped cream with vanilla or almond extract for variety.
With Hot Chocolate or Coffee
- Serve alongside a warm cup of vegan hot chocolate or coffee for a cozy dessert experience.
- A sprinkle of cinnamon on top of the drink complements the cake beautifully.
How to Perfect Vegan Cotton Candy Ice Cream Cake
Creating the perfect Vegan Cotton Candy Ice Cream Cake requires attention to detail. Here are some tips to ensure your cake turns out amazing every time.
- Use fresh ingredients: Fresh dates and high-quality ice cream will enhance the flavor significantly.
- Let it cool completely: Cooling the cake fully before layering is crucial to prevent melting.
- Be patient with freezing: Allow each layer ample time to freeze before adding the next to maintain structure.
- Experiment with colors: Don’t hesitate to try different food colorings to achieve unique designs.
- Use non-stick pans: This will help in removing your cake easily without breaking it apart.
Best Side Dishes for Vegan Cotton Candy Ice Cream Cake
Pairing side dishes with your Vegan Cotton Candy Ice Cream Cake can complement its sweet flavors. Here are some delicious options that work well together.
- Fruit Salad: A mix of seasonal fruits adds freshness and balances sweetness.
- Granola Parfait: Layer granola and dairy-free yogurt for a crunchy, creamy contrast.
- Coconut Macaroons: Chewy macaroons provide an additional coconut flavor that pairs nicely.
- Vegan Cookies: Choose light cookies, like lemon or oatmeal, for a delightful treat alongside.
- Chocolate-Covered Strawberries: These add elegance and are easy to prepare and serve.
- Vegan Cheese Board: Include nuts, dried fruits, and plant-based cheeses for savory bites between sweet layers.
Common Mistakes to Avoid
It’s easy to make mistakes when creating your Vegan Cotton Candy Ice Cream Cake. Here are some common pitfalls to watch out for:
- Not blending dates well: Ensure the dates are fully blended with the water for a smooth batter. This prevents chunks in your cake.
- Skipping the cooling step: Allowing the cake to cool completely is crucial. If you skip this, the layers may not hold together properly.
- Overfilling the cake pan: Filling the pan more than 2/3 full can cause the cake to overflow while baking. Stick to the recommended amount for best results.
- Ignoring freezing times: Each layer needs adequate time in the freezer. Skipping this can lead to a messy cake when slicing.
- Using warm ingredients: Make sure all ingredients, especially ice cream and Cocowhip, are cold before assembling. Warm ingredients can melt your layers together.
Refrigerator Storage
- Store leftover cake in an airtight container.
- It will last up to 3 days in the refrigerator.
Freezing Vegan Cotton Candy Ice Cream Cake
- Wrap tightly in plastic wrap before placing it in an airtight container.
- It can be frozen for up to a week without losing quality.
Reheating Vegan Cotton Candy Ice Cream Cake
- Oven: Preheat to 350°F and warm for about 10 minutes, but be careful as this may soften ice cream layers.
- Microwave: Use low power and heat in short intervals of 10 seconds until slightly softened.
- Stovetop: Not recommended as this may ruin the texture.
Frequently Asked Questions
What is Vegan Cotton Candy Ice Cream Cake?
The Vegan Cotton Candy Ice Cream Cake is a delightful dessert made from layers of colorful ice cream and a soft cake base, perfect for celebrations.
How do I customize my Vegan Cotton Candy Ice Cream Cake?
You can customize this cake by using different flavors of ice cream or adding your favorite toppings like nuts or fresh fruit.
Can I make this cake ahead of time?
Yes! This cake can be made ahead and frozen overnight, making it perfect for parties or gatherings.
Is there a nut-free version of Vegan Cotton Candy Ice Cream Cake?
You can substitute cashew-based products with coconut or soy alternatives if you prefer a nut-free version.
How should I serve Vegan Cotton Candy Ice Cream Cake?
Slice it into wedges and serve immediately after removing it from the freezer for optimal texture and flavor.
Final Thoughts
The Vegan Cotton Candy Ice Cream Cake is a vibrant and fun dessert that appeals to both kids and adults alike. Its whimsical colors and delicious flavors make it perfect for any occasion. Feel free to get creative with different color combinations or flavors to suit your taste!
Vegan Cotton Candy Ice Cream Cake

Indulge in the whimsical delight of Vegan Cotton Candy Ice Cream Cake, a vibrant dessert that captures the essence of childhood fun in every bite. This delightful cake features colorful layers of creamy, plant-based ice cream, perfectly balanced with a soft cake base. Ideal for birthdays, summer celebrations, or simply as a refreshing treat, this dessert is not only visually stunning but also completely dairy-free. With its blend of fruity flavors and eye-catching hues, it’s sure to impress guests and satisfy vegans and non-vegans alike. Get ready to make your next gathering unforgettable with this creamy, colorful masterpiece!
- Prep Time: 30 minutes
- Cook Time: 35 minutes
- Total Time: 1 hour 5 minutes
- Yield: Approximately 8 servings 1x
- Category: Dessert
- Method: Baking
- Cuisine: Vegan
Ingredients
- 12 pitted Medjool dates
- 1 cup water
- 1 cup oat flour
- 1 tbsp baking powder
- 2 tbsp tapioca flour
- 1 tsp vanilla extract
- 1/4 cup unsweetened shredded coconut
- Natural blue food coloring (to preference)
- Pitaya puree (about 5-6 tbsp total)
- 1.5 cups So Delicious Creamy Cashew Cashewmilk Ice Cream
- 2 cups Cocowhip
Instructions
- Blend the water and dates until smooth.
- In a mixing bowl, combine the date mixture with oat flour, baking powder, tapioca flour, vanilla extract, shredded coconut, blue food coloring, and pitaya puree; mix well.
- Lightly oil a 6-inch round cake pan and pour in the batter until two-thirds full.
- Bake at 325°F for 30–35 minutes until the center springs back when touched.
- Let the cake cool completely before slicing it into two layers horizontally.
- Prepare colored coconut by mixing separately and letting it dry overnight.
- Assemble layers using a springform pan: start with one layer of cake, followed by pink ice cream layer (freeze for an hour), then add blue ice cream layer (freeze again).
- Finish with the second layer of cake and top with pink Cocowhip mixed with pitaya puree; freeze overnight.
- Slice after resting at room temperature for 10–15 minutes.
Nutrition
- Serving Size: 1 serving
- Calories: 220
- Sugar: 20g
- Sodium: 50mg
- Fat: 8g
- Saturated Fat: 6g
- Unsaturated Fat: 2g
- Trans Fat: 0g
- Carbohydrates: 33g
- Fiber: 3g
- Protein: 3g
- Cholesterol: 0mg
Leave a Comment