
Homemade Reese’s Peanut Butter Cups are a delightful treat that combines creamy peanut butter with a rich chocolate shell. Perfect for parties, movie nights, or just a sweet craving, these cups are sure to impress. Easy to make and customize, they bring the joy of a classic candy into your kitchen. Plus, you can enjoy them fresh, knowing exactly what goes into each delicious bite!
Why You’ll Love This Recipe
- Simple to Make: With just a few ingredients, you can whip up these treats in under 35 minutes.
- Customizable Flavors: Adjust the sweetness or add toppings like chopped peanuts to suit your taste.
- Perfect for Any Occasion: Whether it’s a birthday party or a cozy night in, these cups fit right in.
- No Baking Required: Enjoy the ease of making a dessert without turning on the oven.
- Great for Sharing: These homemade peanut butter cups make an excellent gift or party favor.
Tools and Preparation
Before diving into this delicious recipe for Homemade Reese’s Peanut Butter Cups, gather your tools. Having everything ready will make the process smoother and more enjoyable.
Essential Tools and Equipment
- Muffin tin
- Cupcake liners or silicone molds
- Microwave-safe bowl or double boiler
- Mixing bowl
- Spoon or spatula
Importance of Each Tool
- Muffin tin: Provides structure for your peanut butter cups and helps shape them perfectly.
- Microwave-safe bowl: Ideal for melting chocolate quickly and safely without any mess.
- Spatula: Ensures even mixing and helps transfer ingredients smoothly.
Ingredients
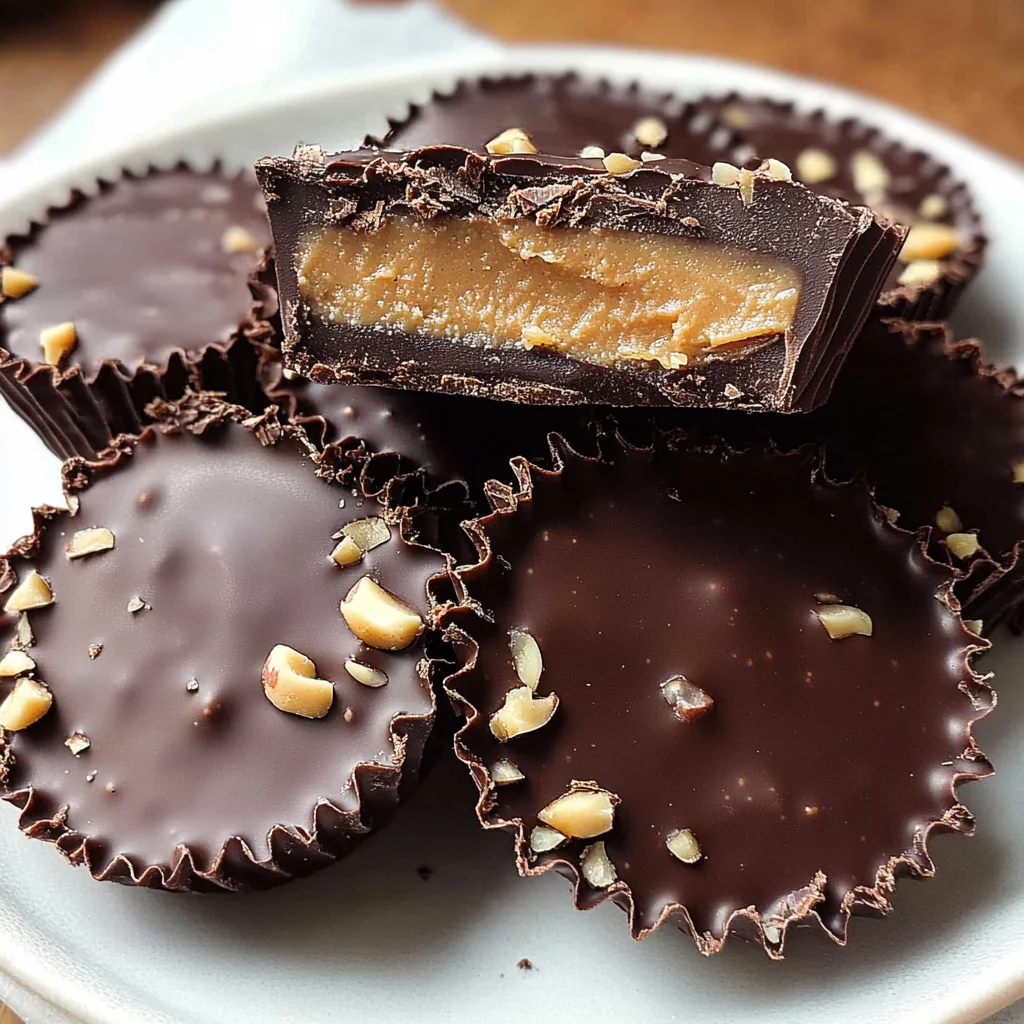
Delicious homemade peanut butter cups with a creamy center and a rich chocolate shell.
For the Peanut Butter Filling
- 1 cup creamy peanut butter
- 1/4 cup powdered sugar
- 1/2 teaspoon vanilla extract
For the Chocolate Shell
- 1 1/2 cups chocolate chips
- 1/4 cup chopped peanuts (optional)
Other Supplies
- Cupcake liners or silicone molds
How to Make Homemade Reese’s Peanut Butter Cups
Step 1: Prepare the Peanut Butter Mixture
In a bowl, mix the creamy peanut butter, powdered sugar, and vanilla extract. Stir until smooth. This mixture will be the creamy filling inside your cups.
Step 2: Melt the Chocolate
Melt the chocolate chips in a microwave-safe bowl or double boiler. Stir continuously until fully melted to avoid burning. This will create your chocolate shell.
Step 3: Line Your Molds
Line a muffin tin with cupcake liners or prepare silicone molds. This step is essential for easy removal later on.
Step 4: Add Chocolate Base
Pour a small amount of melted chocolate into each liner, covering the bottom completely. Tap gently to ensure an even layer.
Step 5: Fill with Peanut Butter Mixture
Add a layer of the peanut butter mixture on top of the melted chocolate. Use a spoon to spread it evenly across each cup.
Step 6: Top with More Chocolate
Pour more melted chocolate over the peanut butter layer to cover completely. Ensure no peanut butter is visible.
Step 7: Add Optional Toppings
If desired, sprinkle chopped peanuts on top before allowing the chocolate to set for added crunch and flavor.
Step 8: Chill Until Firm
Refrigerate for about 30 minutes or until the chocolate is firm. This step ensures that your homemade Reese’s Peanut Butter Cups hold their shape.
Step 9: Enjoy!
Remove from the liners and enjoy your homemade Reese’s Peanut Butter Cups! Share them with friends or keep them all to yourself—they’re too good to resist!
How to Serve Homemade Reese’s Peanut Butter Cups
Homemade Reese’s Peanut Butter Cups are a delightful treat that can be enjoyed in various ways. Whether you’re hosting a party or enjoying them on a cozy night in, these serving suggestions will enhance your experience.
With a Glass of Milk
- Pairing creamy whole milk with your peanut butter cups creates a classic combination. The milk balances the rich chocolate and creamy peanut butter.
On a Dessert Platter
- Arrange sliced homemade peanut butter cups on a dessert platter alongside other sweets. This makes for an eye-catching centerpiece at gatherings.
With Coffee or Hot Chocolate
- Enjoy your peanut butter cups with a steaming cup of coffee or rich hot chocolate. The contrast of flavors offers a delightful experience for dessert lovers.
As Ice Cream Toppings
- Chop up the peanut butter cups and use them as tasty ice cream toppings. They add a delicious crunch and flavor to your favorite ice cream flavors.
In Baking Recipes
- Crumble the peanut butter cups into brownies or cookies for an extra treat. This adds depth to your baked goods with minimal effort.
How to Perfect Homemade Reese’s Peanut Butter Cups
Creating the perfect homemade Reese’s Peanut Butter Cups is about attention to detail. Follow these tips for the best results:
- Use quality chocolate: Choose high-quality chocolate chips for melting, which ensures a smooth and rich outer shell.
- Let chocolate cool slightly: Allow melted chocolate to cool just enough before pouring it over the peanut butter to prevent it from mixing.
- Chill between layers: Refrigerate briefly between adding layers of chocolate and peanut butter to keep them distinct.
- Experiment with textures: Try adding different nuts or cookie crumbs inside for added texture and flavor variation.
- Store properly: Keep leftover peanut butter cups in an airtight container in the fridge to maintain freshness.
Best Side Dishes for Homemade Reese’s Peanut Butter Cups
While homemade Reese’s Peanut Butter Cups are delicious on their own, you can enhance your dessert experience with these complementary side dishes.
- Fresh Fruit Salad
A light and refreshing option, fruit salad balances the richness of the peanut butter cups with its natural sweetness. - Chocolate Dipped Strawberries
These add another layer of chocolatey goodness that pairs perfectly with your homemade treats. - Vanilla Ice Cream
A scoop of vanilla ice cream provides a creamy contrast that perfectly complements the flavors of the peanut butter cups. - Cheesecake Bites
These small bites offer a tangy flavor that contrasts nicely with the sweetness of the homemade treats. - Nutty Granola Bars
A crunchy granola bar can provide an additional texture element that enhances your dessert experience. - Coffee Cake Muffins
These muffins add a delightful sweetness and crumbly texture, making them a great companion to your desserts.
Common Mistakes to Avoid
Making Homemade Reese’s Peanut Butter Cups can be simple, but there are a few common pitfalls. Avoiding these mistakes will ensure your treats turn out perfectly.
- Using the wrong type of peanut butter: Always use creamy peanut butter for a smooth texture. Crunchy varieties may disrupt the consistency and make it hard to layer.
- Not melting chocolate properly: Ensure you melt chocolate slowly to prevent burning. Use a microwave in short bursts or a double boiler for best results.
- Skipping the refrigeration step: Refrigerating your cups is crucial for setting the chocolate. Skipping this can result in messy, soft treats that won’t hold their shape.
- Overfilling the molds: Be careful not to fill your molds too high with either chocolate or peanut butter. Leave some space for the top layer of chocolate to cover completely.
- Neglecting to add toppings: Consider adding chopped peanuts or sea salt on top before the chocolate sets. This adds extra flavor and texture.
Storage & Reheating Instructions
Refrigerator Storage
- Store your homemade Reese’s Peanut Butter Cups in an airtight container.
- They will stay fresh for up to one week in the refrigerator.
Freezing Homemade Reese’s Peanut Butter Cups
- Place your cups in a single layer in an airtight freezer-safe container.
- They can be frozen for up to three months, ensuring they are well-wrapped to prevent freezer burn.
Reheating Homemade Reese’s Peanut Butter Cups
- Oven: Preheat to 350°F (175°C). Place cups on a baking sheet and warm for about 5 minutes until slightly softened.
- Microwave: Heat on low power for 10-15 seconds. Keep an eye on them to avoid melting too much.
- Stovetop: Use a pan on low heat with a lid. Place cups inside and warm gently, checking frequently.
Frequently Asked Questions
Here are some common questions about making Homemade Reese’s Peanut Butter Cups.
Can I use dark chocolate instead of milk chocolate?
Yes, dark chocolate can be used for a richer flavor. Just make sure it’s good quality for the best results.
How do I customize my Homemade Reese’s Peanut Butter Cups?
You can add flavors like almond extract or mix in crushed cookies for different textures and tastes. Experiment with toppings as well!
What is the best way to serve these treats?
Serve them chilled or at room temperature. They make great party snacks or dessert options!
How long do homemade peanut butter cups last?
When stored correctly, they last up to one week in the refrigerator and can be frozen for up to three months.
Final Thoughts
These Homemade Reese’s Peanut Butter Cups are not only delicious but also easy to make! Their versatility allows you to customize flavors and textures, making them perfect for any occasion. Give this recipe a try and impress friends and family with your homemade treats!
Homemade Reese’s Peanut Butter Cups
Indulge in the irresistible delight of Homemade Reese’s Peanut Butter Cups! This easy-to-follow recipe combines creamy peanut butter with a rich chocolate shell, making it a perfect treat for any occasion.
- Prep Time: 15 minutes
- Cook Time: 20 minutes
- Total Time: 35 minutes
- Yield: Approximately 12 servings 1x
- Category: Dessert
- Method: No-Bake
- Cuisine: American
Ingredients
- 1 cup creamy peanut butter
- 1/4 cup powdered sugar
- 1/2 teaspoon vanilla extract
- 1 1/2 cups chocolate chips
- 1/4 cup chopped peanuts (optional)
Instructions
- In a mixing bowl, combine creamy peanut butter, powdered sugar, and vanilla extract until smooth.
- Melt chocolate chips in a microwave-safe bowl or double boiler, stirring continuously until fully melted.
- Line a muffin tin with cupcake liners or use silicone molds.
- Pour a small amount of melted chocolate into each liner to cover the bottom.
- Add an even layer of the peanut butter mixture on top of the chocolate layer.
- Pour more melted chocolate over the peanut butter layer to cover completely.
- Optionally, sprinkle chopped peanuts on top before chilling.
- Refrigerate for about 30 minutes until firm, then remove from liners and enjoy!
Nutrition
- Serving Size: 1 cup [30g]
- Calories: 150
- Sugar: 10g
- Sodium: 100mg
- Fat: 10g
- Saturated Fat: 3g
- Unsaturated Fat: 6g
- Trans Fat: 0g
- Carbohydrates: 14g
- Fiber: 2g
- Protein: 4g
- Cholesterol: 0mg
Leave a Comment