How to Make a Tie-Dye Cake is a delightful way to add color and fun to any celebration. This vibrant dessert is perfect for birthdays, holidays, or just a cheerful treat at home. With its eye-catching layers of color and delicious vanilla flavor, it promises to be a crowd-pleaser at any gathering.
Why You’ll Love This Recipe
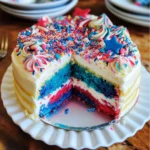
- Visually Stunning: The tie-dye effect creates a beautiful presentation that is sure to impress guests.
- Customizable Colors: Use any food coloring to match the theme of your event, making this cake versatile for all occasions.
- Simple Process: The steps are easy to follow, making it suitable even for novice bakers.
- Delicious Flavor: The homemade vanilla buttercream frosting pairs perfectly with the moist cake.
- Perfect for Sharing: This recipe yields enough servings to delight a group, making it great for parties.
Tools and Preparation
To create your tie-dye cake, having the right tools on hand will make the process smoother and more enjoyable. Here’s what you’ll need:
Essential Tools and Equipment
- 9-inch round cake pan (or springform pan)
- Parchment paper
- Mixing bowls
- Measuring cups and spoons
- Electric mixer or whisk
Importance of Each Tool
- 9-inch round cake pan: Ensures even baking and allows for easy layering.
- Parchment paper: Helps the cake release easily from the pan without sticking.
- Mixing bowls: Keeps your ingredients organized while mixing different colors.
Ingredients
To make How to Make a Tie-Dye Cake, gather the following ingredients:
For the Cake
- Recipe for 1-layer sprinkle cake (leave out the sprinkles in the batter)
- Food coloring
For the Frosting
- Recipe for homemade vanilla buttercream
For Decoration
- Sprinkles for decoration
How to Make How to Make a Tie-Dye Cake
Step 1: Preheat the Oven
Preheat your oven to 350°F (177°C). Grease one 9-inch round cake pan (or springform pan), line it with a round of parchment paper, then grease the parchment paper. Parchment paper helps the cakes seamlessly release from the pans.
Step 2: Prepare the Batter
Make the cake batter according to my directions (see link in the ingredient list). Divide the white batter into three separate bowls. Grab your food coloring and dye your batters any color you choose. I used 10 drops of red, 10 drops of blue, and left one bowl plain. Place a separate spoon in each bowl. Scoop large spoonfuls of each batter and layer them into your prepared baking pan. It does not have to be pretty—the colors will create a tie-dye effect.
Step 3: Bake Your Cake
Bake for 20 minutes. Cover loosely with aluminum foil (to avoid sticking) and bake for an additional 13-17 minutes, or until a toothpick inserted in the center comes out clean. Allow it to cool after baking.
Step 4: Frost and Decorate
Make the frosting according to my directions (see link for frosting in ingredient list). Frost your cooled cake and decorate as desired with sprinkles. The cake will stay fresh covered at room temperature or in the refrigerator for up to 5 days.
With this step-by-step guide on how to make a tie-dye cake, you’ll create an unforgettable dessert that brings joy and excitement to any occasion!

How to Serve How to Make a Tie-Dye Cake
Serving your tie-dye cake can be as fun and colorful as the cake itself! Here are some creative ways to present your delicious creation at any gathering.
Colorful Cake Slices
- Serve individual slices of the tie-dye cake on bright, fun plates to enhance the festive atmosphere.
Cupcake Versions
- Make cupcakes using the same batter. Top with colorful frosting and sprinkles for easy serving at parties.
Layered Dessert Cups
- Cut the cake into small pieces and layer them in clear cups with whipped cream and fruit for a beautiful dessert display.
Birthday Celebration
- Use the tie-dye cake as a centerpiece for birthday parties. Add candles on top for an exciting surprise when cutting the cake.
Coffee and Cake Pairing
- Pair slices of tie-dye cake with coffee or tea. The vibrant colors and flavors make for a delightful afternoon treat.
How to Perfect How to Make a Tie-Dye Cake
Perfecting your tie-dye cake will ensure it looks stunning and tastes amazing. Here are some helpful tips:
- Use Quality Food Coloring: Invest in gel food coloring for brighter, more vibrant colors that won’t water down your batter.
- Don’t Overmix: When combining your colored batters, avoid overmixing to keep distinct layers that create beautiful swirls.
- Let It Cool Completely: Ensure your cake is completely cool before frosting. This prevents melting and sliding of the frosting.
- Experiment with Colors: Try different color combinations! Mix pastels or bold hues based on the occasion for added creativity.
- Decorate Generously: Use sprinkles and edible glitter on top of your buttercream to enhance the visual appeal of your tie-dye cake.
Best Side Dishes for How to Make a Tie-Dye Cake
To complement your tie-dye cake at gatherings, consider these delicious side dishes that pair wonderfully with it.
- Fruit Salad: A refreshing mix of seasonal fruits provides a light contrast to the sweetness of the cake.
- Mini Sandwiches: Small sandwiches filled with assorted meats, cheeses, or veggies offer savory bites alongside sweet treats.
- Vegetable Platter: Crisp veggies served with dip add crunch and balance out the rich flavors of the cake.
- Cheese Board: A selection of cheeses can elevate your dessert table, offering guests a variety of tastes.
- Chocolate-Dipped Strawberries: These sweet snacks are perfect for dipping into chocolate sauce, adding extra fun to dessert time.
- Ice Cream Sundae Bar: Set up a station where guests can build their own sundaes, providing an interactive dessert experience.
Common Mistakes to Avoid
It’s easy to make mistakes when learning how to make a tie-dye cake. Here are some common pitfalls and how to avoid them.
- Ignoring the parchment paper: Skipping this step can lead to a cake that sticks to the pan. Always line your pans with parchment paper for easy release.
- Overmixing the batter: Mixing too much can make your cake dense. Mix just until combined for a light and fluffy texture.
- Not using enough food coloring: If you want vibrant colors, don’t skimp on the food coloring. Test different amounts until you get your desired shade.
- Baking at the wrong temperature: Make sure your oven is preheated correctly. An incorrect temperature can affect baking time and cake texture.
- Skipping cooling time: Cutting into a warm cake can cause it to crumble. Let it cool completely before frosting for the best results.
Refrigerator Storage
- Store in an airtight container for up to 5 days.
- Place wax paper between layers if stacking cakes to prevent sticking.
Freezing How to Make a Tie-Dye Cake
- Wrap tightly in plastic wrap and then in aluminum foil.
- Can be frozen for up to 3 months for best quality.
Reheating How to Make a Tie-Dye Cake
- Oven: Preheat to 350°F (177°C) and heat covered with foil for about 15 minutes.
- Microwave: Use short bursts of 10-15 seconds until warmed through, but be cautious not to dry it out.
- Stovetop: Place slices in a skillet over low heat, covered, for about 5 minutes or until warm.
Frequently Asked Questions
Here are some common questions about how to make a tie-dye cake.
Can I use different flavors of cake?
Yes! You can easily customize flavors by adding extracts like almond or lemon.
How do I achieve the best tie-dye effect?
Layer the batters haphazardly. The more random, the better the tie-dye effect will be once baked!
Can I make cupcakes instead?
Absolutely! Follow the same instructions but use cupcake liners instead of a cake pan.
How long does the tie-dye cake last?
The cake remains fresh for up to 5 days at room temperature when stored properly.
Final Thoughts
This colorful tie-dye cake is perfect for any celebration! Its vibrant appearance and delicious flavor make it a crowd-pleaser. You can also customize it with different colors or flavors based on your preferences. Try making it for birthdays, holidays, or just because!
How to Make a Tie-Dye Cake
How to Make a Tie-Dye Cake is your go-to recipe for a visually stunning and delicious dessert that is sure to be the highlight of any celebration. With its vibrant swirls of color and rich vanilla flavor, this cake is perfect for birthdays, holidays, or simply adding a touch of joy to your day. The easy-to-follow instructions make it suitable for bakers of all skill levels, ensuring you can impress your guests with minimal effort. Customize the colors to match your event theme and pair it with homemade vanilla buttercream for an unforgettable treat.
- Prep Time: 20 minutes
- Cook Time: 35 minutes
- Total Time: 55 minutes
- Yield: Approximately 10 servings 1x
- Category: Dessert
- Method: Baking
- Cuisine: American
Ingredients
- 1 layer sprinkle cake recipe (sprinkles omitted)
- Food coloring (various colors)
- Homemade vanilla buttercream frosting
- Sprinkles for decoration
Instructions
- Preheat the oven to 350°F (177°C). Grease and line a 9-inch round cake pan with parchment paper.
- Prepare the cake batter as per your recipe. Divide the batter into three bowls and color each with food coloring.
- Layer spoonfuls of the colored batters into the prepared pan in a random pattern.
- Bake for 20 minutes, then cover with foil and bake for an additional 13-17 minutes until a toothpick comes out clean. Cool completely before frosting.
- Frost with vanilla buttercream and decorate with sprinkles.
Nutrition
- Serving Size: 1 slice (100g)
- Calories: 320
- Sugar: 28g
- Sodium: 210mg
- Fat: 15g
- Saturated Fat: 8g
- Unsaturated Fat: 5g
- Trans Fat: 0g
- Carbohydrates: 42g
- Fiber: 1g
- Protein: 3g
- Cholesterol: 40mg
Leave a Comment