
These High Protein Twix Bars are the perfect treat for anyone looking for a delicious yet nutritious snack. Made with natural whole food ingredients and packed with protein, these bars offer a healthy twist on the classic candy bar. Whether you’re prepping for a workout, need a midday snack, or want something sweet to satisfy your cravings, these bars fit the bill. Plus, they are easy to make and can be stored for later enjoyment!
Why You’ll Love This Recipe
- Nutritious Ingredients: These bars use whole food ingredients, ensuring you get a healthy treat without artificial additives.
- High in Protein: With added vanilla protein powder, these bars support muscle recovery and keep you feeling full longer.
- Easy to Make: The simple steps mean you can whip up these bars in no time, perfect for busy lifestyles.
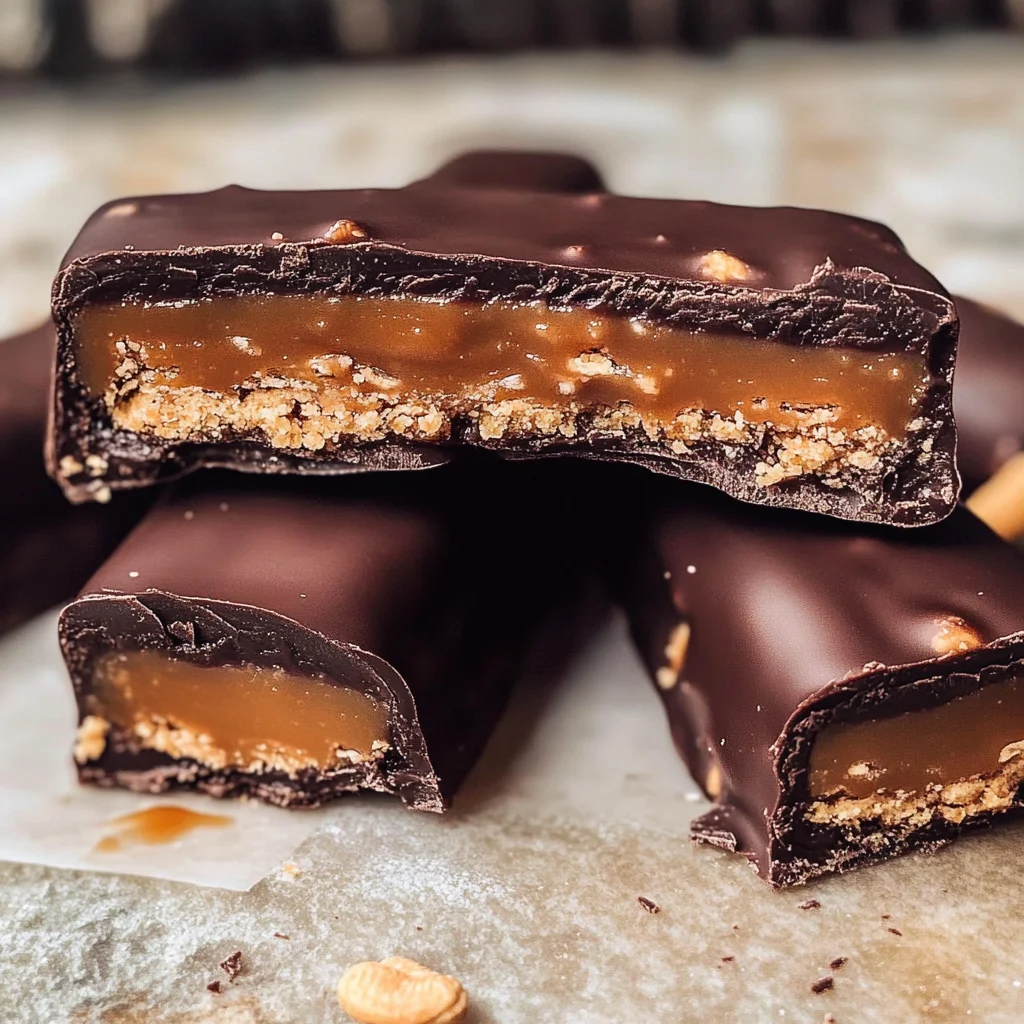
- Versatile Flavor: Enjoy the rich taste of chocolate combined with caramel and cookie layers that mimic the classic Twix flavor.
- Meal Prep Friendly: Store them in the fridge or freezer for quick snacks throughout the week.
Tools and Preparation
To make your cooking experience smoother, having the right tools is essential. Here’s what you’ll need:
Essential Tools and Equipment
- Baking pan (8×8 or 9×9)
- Parchment paper
- Mixing bowls
- Spatula
- Whisk
- Double boiler (or microwave-safe bowl)
Importance of Each Tool
- Baking pan: Provides the shape and size needed for even cutting of the bars.
- Parchment paper: Prevents sticking and helps with easy removal of the finished product.
- Mixing bowls: Allows for proper mixing without spills or messes.
Ingredients
These easy and delicious Twix-like bars are made with natural whole food ingredients and vanilla protein powder, offering a nutritious twist on a homemade candy bar.
Base Layer
- 1 cup oat flour
- ½ cup vanilla protein powder (I’m a big fan of EarthChimp’s protein powder!)
- ¼ cup coconut sugar
- ¼ cup coconut oil
- ¼ cup oat milk (or any milk of choice)
Caramel Layer
- ½ cup cashew butter
- 3 tablespoons maple syrup
- 2 tablespoons coconut oil
- 1 teaspoon vanilla extract
Chocolate Coating
- 2 cups dark chocolate chips (I like to use at least 70% dark chocolate, but any chocolate will do!)
- 1 tablespoon coconut oil
How to Make High Protein Twix Bars
Step 1: Prepare Your Pan
Line a square 8×8 or 9×9 baking pan with parchment paper.
Step 2: Make the Base Layer
In a large mixing bowl:
1. Combine the oat flour, protein powder, coconut sugar, coconut oil, and oat milk.
2. Mix until you have a smooth cookie dough.
3. Press this dough into an even layer in your prepared baking pan.
4. Place the pan into the freezer while you prepare the caramel layer.
Step 3: Prepare the Caramel Layer
In another large mixing bowl:
1. Add cashew butter, maple syrup, coconut oil, and vanilla extract.
2. Whisk until smooth.
3. Pour this caramel over your cookie layer in the baking pan.
4. Spread evenly using a spatula.
Step 4: Chill to Set
Place the pan back into the freezer to set for at least 30 minutes.
Step 5: Melt Chocolate Coating
In a double boiler or microwave:
1. Melt together chocolate chips and coconut oil until smooth.
Step 6: Assemble Bars
- Remove the pan from the freezer.
- Lift out using parchment paper onto a cutting board.
- Cut into 10 equal bars.
Step 7: Coat in Chocolate
- Dip each bar into melted chocolate until fully coated.
- Place back onto parchment paper.
- Return to freezer for just a few minutes to set.
Step 8: Enjoy!
You can enjoy right away or store in an airtight container in the refrigerator for up to one week or freeze for up to six months.
Now that you know how to make these delightful High Protein Twix Bars, get ready to savor every bite!
How to Serve High Protein Twix Bars
High Protein Twix Bars are a delightful treat that can be enjoyed in various ways. Whether you’re serving them at a party or enjoying them as a post-workout snack, these bars offer versatility and flavor.
With a Glass of Milk
- Pair your High Protein Twix Bars with a cold glass of oat milk or almond milk for a creamy complement.
As a Pre-Workout Snack
- Enjoy these bars about 30 minutes before your workout to fuel your body with energy and protein.
Crumbled Over Yogurt
- Crumble the bars over Greek yogurt for added texture and protein, creating a nutritious breakfast or snack.
For Dessert with Fresh Fruit
- Serve alongside fresh berries or sliced bananas for a sweet and fruity contrast.
In Lunchboxes
- Pack individual bars in lunchboxes for a healthy treat at school or work, ensuring you have something tasty on hand.
How to Perfect High Protein Twix Bars
To achieve the best results when making High Protein Twix Bars, keep these tips in mind:
- Use Quality Ingredients: Select high-quality dark chocolate and natural nut butters for the best flavor and nutrition.
- Chill Thoroughly: Ensure each layer is set properly in the freezer before adding the next to maintain structure and prevent melting.
- Experiment with Sweetness: Adjust the amount of coconut sugar or maple syrup based on your preference for sweetness.
- Cut Evenly: Use a hot knife to cut the bars neatly. This helps prevent crumbling and gives you clean edges.
Best Side Dishes for High Protein Twix Bars
High Protein Twix Bars pair well with a variety of side dishes that enhance their flavor profile. Here are some excellent options:
- Fresh Fruit Salad: A mix of seasonal fruits adds freshness and balances the richness of the bars.
- Trail Mix: A combination of nuts, seeds, and dried fruits makes for an energizing side dish that complements the protein content.
- Greek Yogurt Parfait: Layer yogurt with granola and berries for a satisfying meal that pairs well with sweet bars.
- Nut Butter Dip: Serve with apple slices or celery sticks dipped in peanut butter for added protein and crunch.
- Smoothie Bowl: A thick smoothie bowl topped with granola and fruit creates a colorful plate alongside your bars.
- Cheese Platter: Include some cheese varieties to balance the sweetness of the bars with savory flavors.
Common Mistakes to Avoid
Making High Protein Twix Bars can be simple, but a few common mistakes can lead to less-than-perfect results. Here are some pitfalls to watch for:
- Skipping the chilling step: Not allowing the layers to chill properly can result in a bar that falls apart. Always freeze each layer as directed.
- Using low-quality chocolate: Low-quality chocolate may not melt well and can affect the taste. Opt for at least 70% dark chocolate for the best flavor.
- Not measuring ingredients accurately: Using too much or too little of an ingredient can change the texture. Always measure ingredients carefully for consistent results.
- Overmixing the dough: Mixing too much can make your bars dense and tough. Mix until just combined for a lighter texture.
- Ignoring storage instructions: If stored improperly, your bars may lose their freshness. Follow storage guidelines closely to keep them delicious.
Storage & Reheating Instructions
Refrigerator Storage
- Store your High Protein Twix Bars in an airtight container.
- They will stay fresh in the refrigerator for up to 1 week.
Freezing High Protein Twix Bars
- For longer storage, freeze the bars in an airtight container or freezer bag.
- They can last up to 6 months in the freezer without losing quality.
Reheating High Protein Twix Bars
- Oven: Preheat to 350°F (175°C) and heat for about 5-10 minutes until warm.
- Microwave: Heat on medium power for 20-30 seconds at a time until warm, being careful not to melt.
- Stovetop: Use a non-stick pan on low heat, flipping occasionally until warmed through.
Frequently Asked Questions
Here are some common questions about making High Protein Twix Bars that might help you out.
Can I use other protein powders in High Protein Twix Bars?
You can substitute other flavors of protein powder, but vanilla works best for this recipe. Adjust sweetness if using flavored powders.
How do I customize my High Protein Twix Bars?
Add nuts, seeds, or dried fruit between layers for extra texture and flavor. You can also experiment with different types of nut butter.
What is the nutritional value of High Protein Twix Bars?
Each bar contains approximately 453 calories, with 11 grams of protein and healthy fats from coconut oil and cashew butter.
Can I make these bars vegan?
Yes! Use plant-based protein powder and ensure all ingredients are vegan-friendly, such as maple syrup instead of honey.
Final Thoughts
These High Protein Twix Bars offer a delightful balance of nutrition and indulgence. Perfect as a post-workout snack or a sweet treat, they are versatile enough to customize with your favorite add-ins. Give this recipe a try and enjoy a healthier take on candy bars!
High Protein Twix Bars
Indulge in a healthier twist on a classic favorite with these High Protein Twix Bars. Perfect for satisfying your sweet cravings or fueling your workout, these bars combine nutritious whole food ingredients with the rich flavors of chocolate, caramel, and cookie layers. Made with vanilla protein powder, oat flour, and natural sweeteners like coconut sugar and maple syrup, they provide a deliciously decadent treat that doesn’t compromise your health goals. Easy to prepare and great for meal prepping, you can enjoy them fresh or store them for later. Treat yourself guilt-free!
- Prep Time: 20 minutes
- Cook Time: 10 minutes
- Total Time: 30 minutes
- Yield: Makes approximately 10 servings 1x
- Category: Dessert
- Method: Baking
- Cuisine: American
Ingredients
- 1 cup oat flour
- ½ cup vanilla protein powder
- ¼ cup coconut sugar
- ¼ cup coconut oil
- ¼ cup oat milk
- ½ cup cashew butter
- 3 tablespoons maple syrup
- 2 tablespoons coconut oil
- 1 teaspoon vanilla extract
- 2 cups dark chocolate chips
- 1 tablespoon coconut oil
Instructions
- Line an 8"x8" baking pan with parchment paper.
- In a bowl, mix oat flour, protein powder, coconut sugar, melted coconut oil, and oat milk until smooth. Press into the prepared pan and freeze while you prepare the caramel.
- In another bowl, whisk together cashew butter, maple syrup, melted coconut oil, and vanilla extract until smooth. Spread over the base layer and freeze again for at least 30 minutes.
- Melt dark chocolate chips with coconut oil in a double boiler or microwave until smooth. Dip each bar into the chocolate to coat evenly.
- Place bars back on parchment paper and freeze briefly to set.
Nutrition
- Serving Size: 1 bar (45g)
- Calories: 453
- Sugar: 12g
- Sodium: 98mg
- Fat: 32g
- Saturated Fat: 15g
- Unsaturated Fat: 16g
- Trans Fat: 0g
- Carbohydrates: 34g
- Fiber: 4g
- Protein: 11g
- Cholesterol: 0mg
Leave a Comment