
This Black Forest Cake recipe is a true delight for chocolate lovers. Combining rich chocolate cake, homemade cherry filling, and fluffy whipped cream, this dessert is perfect for celebrations or just a sweet treat at home. Its layers of flavor and texture make it an unforgettable choice for birthdays, anniversaries, or any occasion where you want to impress guests. Plus, it’s a fun baking project that allows you to showcase your skills!
Why You’ll Love This Recipe
- Decadent Flavor: The combination of chocolate and cherries creates a rich taste that tantalizes the palate.
- Homemade Goodness: Made from scratch, this recipe ensures fresh ingredients for the best flavor.
- Versatile Occasions: Perfect for birthdays, holidays, or casual gatherings; this cake suits any celebration.
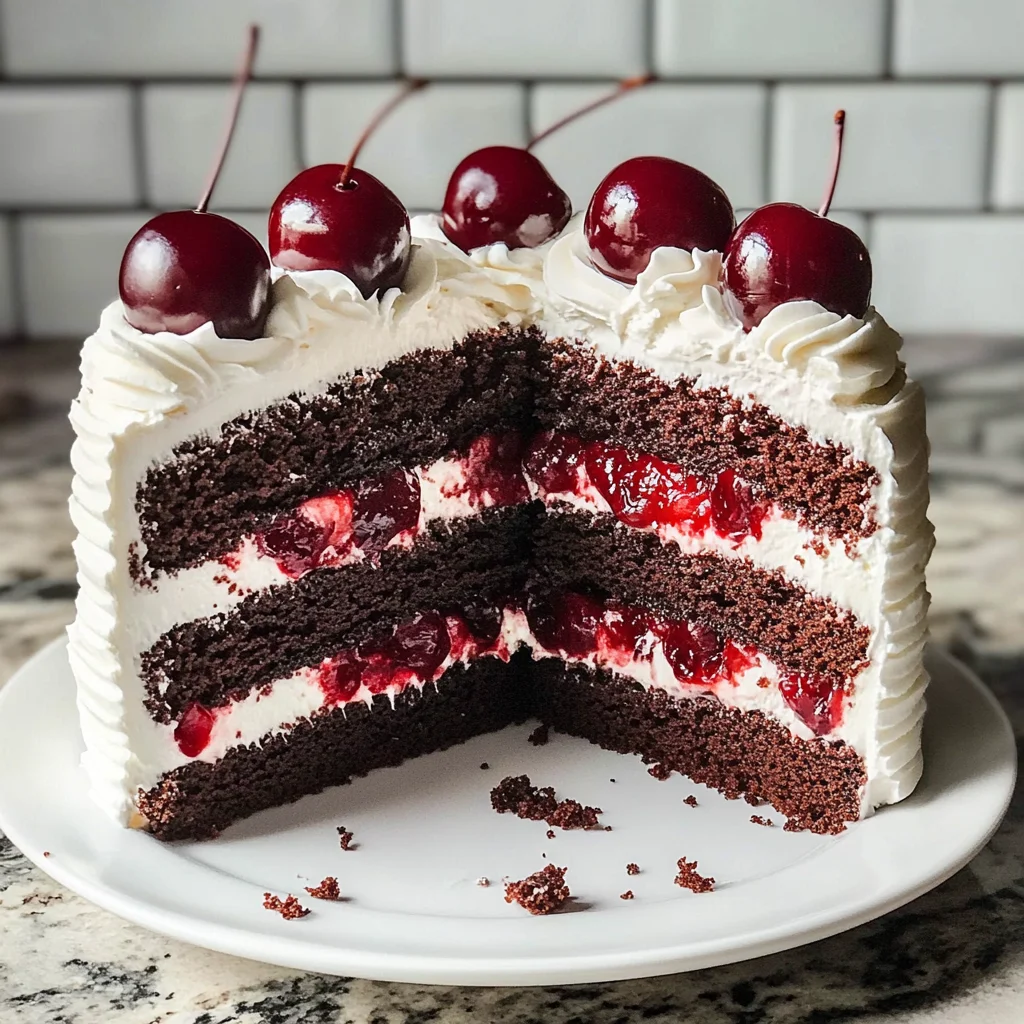
- Impressive Presentation: The layers of chocolate and whipped cream topped with cherries create a stunning visual appeal.
- Customizable: Easily adjust the ingredients or toppings to suit your preferences or dietary needs.
Tools and Preparation
To make the perfect Black Forest Cake, having the right tools makes all the difference. Here’s what you’ll need to get started.
Essential Tools and Equipment
- 2 8-inch round baking pans
- Parchment paper
- Mixing bowls
- Whisk
- Electric mixer (optional)
- Rubber spatula
- Cooling racks
Importance of Each Tool
- Baking pans: Ensure even baking and help shape your cake perfectly.
- Mixing bowls: Essential for combining ingredients efficiently without mess.
- Whisk: Helps incorporate air into your batter for a lighter cake texture.
- Cooling racks: Allow cakes to cool evenly, preventing sogginess.
Ingredients
This Black Forest Cake recipe is made from scratch with my perfect chocolate cake recipe, homemade cherry filling, and vanilla whipped cream!
For the Cake
- 1 3/4 cups all purpose flour
- 3/4 cup dutch processed cocoa powder
- 1 1/2 teaspoons baking powder
- 1 teaspoon baking soda
- 1/2 teaspoon salt
- 1 1/2 cups buttermilk
- 1 teaspoon vanilla extract
- 1 teaspoon instant coffee granules (optional)
- 3/4 cup vegetable oil (canola oil)
- 2 cups granulated sugar
- 2 large eggs
- 1 large egg white
For the Cherry Filling
- 1/2 cup granulated sugar
- 2 1/2 tablespoons cornstarch
- 2 cups tart cherries (frozen or canned, drained) + extra for garnish if not using fresh
- 1 tablespoon butter
- 1/4 teaspoon almond extract
For the Whipped Cream Layer
- 6 tablespoons chocolate syrup (divided)
- 1 1/2 cups heavy whipping cream
- 1/4 cup powdered sugar
- 2 teaspoons vanilla extract
For Garnish
- 8 oz bittersweet baking chocolate (I used Ghirardelli – 2 bars)
- 8-12 fresh cherries (optional, for garnish)
How to Make Black Forest Cake
Step 1: Preheat the Oven
Preheat the oven to 350°F. Line two 8-inch round baking pans with parchment paper and/or spray well with nonstick cooking spray. Set aside.
Step 2: Prepare the Dry Ingredients
In a large bowl, whisk together the flour, cocoa powder, baking powder, baking soda, and salt until combined. Set aside.
Step 3: Mix Wet Ingredients
In a liquid measuring cup, stir together buttermilk, instant coffee granules (if using), and vanilla extract. Allow the coffee granules to dissolve over about 5-10 minutes while preparing other ingredients.
Step 4: Combine Mixtures
In another large bowl, mix together oil and sugar until combined. Add eggs and egg white one at a time until mixture lightens in color. Scrape down sides of bowl as needed. Alternate adding in flour mixture with milk mixture, starting and ending with flour. Mix until smooth.
Step 5: Bake the Cakes
Divide the chocolate cake batter evenly between the two prepared pans. Smooth out tops with a spatula. Bake for about 28-35 minutes in the lower two-thirds of the oven. The cakes are done when a toothpick comes out clean or mostly clean with just a few moist crumbs attached.
Step 6: Cool Completely
Allow cakes to cool in pans for about 15-20 minutes before inverting onto cooling racks. Let them cool completely before frosting and decorating.
Now that you have these steps outlined clearly, you’re on your way to creating an exquisite Black Forest Cake!
How to Serve Black Forest Cake
Serving Black Forest Cake can elevate any occasion, from birthdays to dinner parties. Here are some delightful ways to present this decadent dessert.
Classic Presentation
- Slice and Serve: Cut the cake into even slices and serve with a dollop of whipped cream on top for a classic touch.
Garnished with Cherries
- Fresh Cherry Topping: Add fresh cherries on top for a pop of color and additional flavor.
Chocolate Drizzle
- Drizzled Chocolate Syrup: Finish with a drizzle of chocolate syrup over the top for an extra indulgent look.
Ice Cream Pairing
- Serve with Vanilla Ice Cream: The creamy texture of vanilla ice cream complements the rich flavors of the cake wonderfully.
Coffee Infusion
- Pair with Coffee: Offer a cup of freshly brewed coffee alongside to balance the sweetness.
Festive Plate Arrangement
- Layered Dessert Plates: Create individual servings by layering pieces of cake with whipped cream and cherries in clear dessert cups.
How to Perfect Black Forest Cake
Perfecting your Black Forest Cake involves attention to detail and quality ingredients. Here are some tips to ensure your cake shines.
- Use Quality Cocoa Powder: High-quality cocoa powder enhances the chocolate flavor, making your cake richer.
- Don’t Skip the Buttermilk: Buttermilk adds moisture and tenderness to the cake, resulting in a fluffier texture.
- Check for Doneness Early: Start checking your cake around 25 minutes to avoid overbaking; ovens can vary significantly.
- Cool Completely Before Frosting: Ensure your cakes are completely cool before frosting to prevent melting and sliding.
- Homemade Cherry Filling is Best: Using homemade cherry filling gives you control over sweetness and flavor, elevating your dessert.
- Chill Your Whipped Cream: Keep your whipped cream cold before frosting for better stability and a perfect finish.
Best Side Dishes for Black Forest Cake
Pairing side dishes with your Black Forest Cake can enhance the overall dining experience. Consider these delicious options.
- Fruit Salad: A light fruit salad balances the richness of the cake and adds freshness.
- Chocolate Mousse: Rich chocolate mousse pairs well, creating an indulgent dessert duo.
- Cheese Platter: A selection of cheeses offers a savory contrast that complements the sweet flavors.
- Pavlova: This airy meringue dessert provides a delightful textural contrast to the dense cake.
- Coffee Granita: A refreshing coffee granita can cleanse the palate after enjoying rich chocolate flavors.
- Mini Pecan Tarts: These bite-sized tarts add another layer of flavor and texture without overwhelming guests.
Common Mistakes to Avoid
Making Black Forest Cake can be a delightful experience, but there are common pitfalls you should watch out for.
- Ignoring the importance of accurate measurements: Baking is a science, so using incorrect measurements can ruin your cake. Always use measuring cups and spoons for precision.
- Skipping the cooling step: Attempting to frost a warm cake can lead to melted frosting. Allow your cakes to cool completely before decorating them.
- Not using quality ingredients: The flavor of your Black Forest Cake heavily relies on the quality of the cocoa, cherries, and cream. Invest in good-quality ingredients for the best results.
- Overmixing the batter: Overmixing can create a dense cake texture. Mix just until combined for a light and fluffy result.
- Neglecting garnishes: A beautifully garnished cake enhances its appeal. Don’t forget to top your Black Forest Cake with fresh cherries and chocolate shavings!
Storage & Reheating Instructions
Refrigerator Storage
- Store in an airtight container for up to 5 days.
- Keep layers separated with parchment paper to prevent sticking.
Freezing Black Forest Cake
- Wrap individual slices tightly in plastic wrap, then foil, for up to 3 months.
- To freeze an entire cake, ensure it is well-wrapped and placed in a suitable container.
Reheating Black Forest Cake
- Oven: Preheat to 350°F and warm slices for about 10 minutes. Cover with foil to prevent drying.
- Microwave: Heat slices on medium power for 15-20 seconds. Watch closely to avoid overheating.
- Stovetop: Place slices in a skillet over low heat, covering with a lid until warmed through.
Frequently Asked Questions
What is Black Forest Cake?
Black Forest Cake is a rich chocolate cake layered with cherries and whipped cream. It’s known for its decadent flavors and beautiful presentation.
Can I use fresh cherries instead of canned?
Yes! Fresh cherries add a delightful touch but ensure they are pitted and properly prepared before adding them to your cake.
How do I make my Black Forest Cake less sweet?
To reduce sweetness, cut back slightly on the sugar in the cake batter or use unsweetened cocoa powder.
Can I make Black Forest Cake ahead of time?
Absolutely! You can bake the cakes ahead of time and store them as directed. Frost just before serving for optimal freshness.
What can I substitute for buttermilk?
You can mix regular milk with a tablespoon of vinegar or lemon juice as an easy substitute for buttermilk in this recipe.
Final Thoughts
This delicious Black Forest Cake is perfect for any occasion, from birthdays to holidays. With its rich chocolate layers, cherry filling, and fluffy whipped cream, it’s sure to impress anyone who tries it. Feel free to customize it with different fruits or toppings based on your preference!
Black Forest Cake
Indulge in the ultimate dessert experience with this decadent Black Forest Cake. This classic German treat features rich chocolate layers complemented by a homemade cherry filling and luscious whipped cream. Perfect for birthdays, anniversaries, or any special occasion, this cake is not only a feast for the taste buds but also a visual delight, sure to impress your guests. The combination of flavors and textures – from the moist chocolate cake to the tart cherries and fluffy cream – makes every bite unforgettable. Whether you’re an experienced baker or trying your hand at baking for the first time, this recipe promises satisfaction and a touch of elegance to your celebrations.
- Prep Time: 30 minutes
- Cook Time: 35 minutes
- Total Time: 1 hour 5 minutes
- Yield: Serves approximately 12 slices 1x
- Category: Dessert
- Method: Baking
- Cuisine: German
Ingredients
- 1 3/4 cups all-purpose flour
- 3/4 cup Dutch-process cocoa powder
- 1 1/2 teaspoons baking powder
- 1 teaspoon baking soda
- 1/2 teaspoon salt
- 1 1/2 cups buttermilk
- 3/4 cup vegetable oil
- 2 cups granulated sugar
- 2 large eggs
- 2 cups tart cherries (frozen or canned)
- 6 tablespoons chocolate syrup
- 1 1/2 cups heavy whipping cream
Instructions
- Preheat your oven to 350°F (175°C) and prepare two 8-inch round baking pans with parchment paper.
- In a bowl, whisk together flour, cocoa powder, baking powder, baking soda, and salt.
- In another bowl, combine buttermilk, oil, sugar, eggs, and vanilla extract. Mix until smooth.
- Gradually add dry ingredients to the wet mixture until combined.
- Divide batter evenly between prepared pans and bake for 28-35 minutes or until a toothpick comes out clean.
- Cool cakes in pans for about 20 minutes before transferring them to cooling racks.
- Prepare cherry filling by combining cherries with sugar, cornstarch, butter, and almond extract in a saucepan; cook until thickened.
- Whip the cream with powdered sugar and vanilla until soft peaks form.
- Assemble layers: place one cake layer on a serving plate, spread cherry filling on top, add whipped cream layer, then top with the second cake layer.
- Garnish with chocolate shavings and fresh cherries if desired.
Nutrition
- Serving Size: 1 slice (100g)
- Calories: 356
- Sugar: 37g
- Sodium: 295mg
- Fat: 20g
- Saturated Fat: 8g
- Unsaturated Fat: 12g
- Trans Fat: 0g
- Carbohydrates: 39g
- Fiber: 2g
- Protein: 4g
- Cholesterol: 57mg
Leave a Comment