
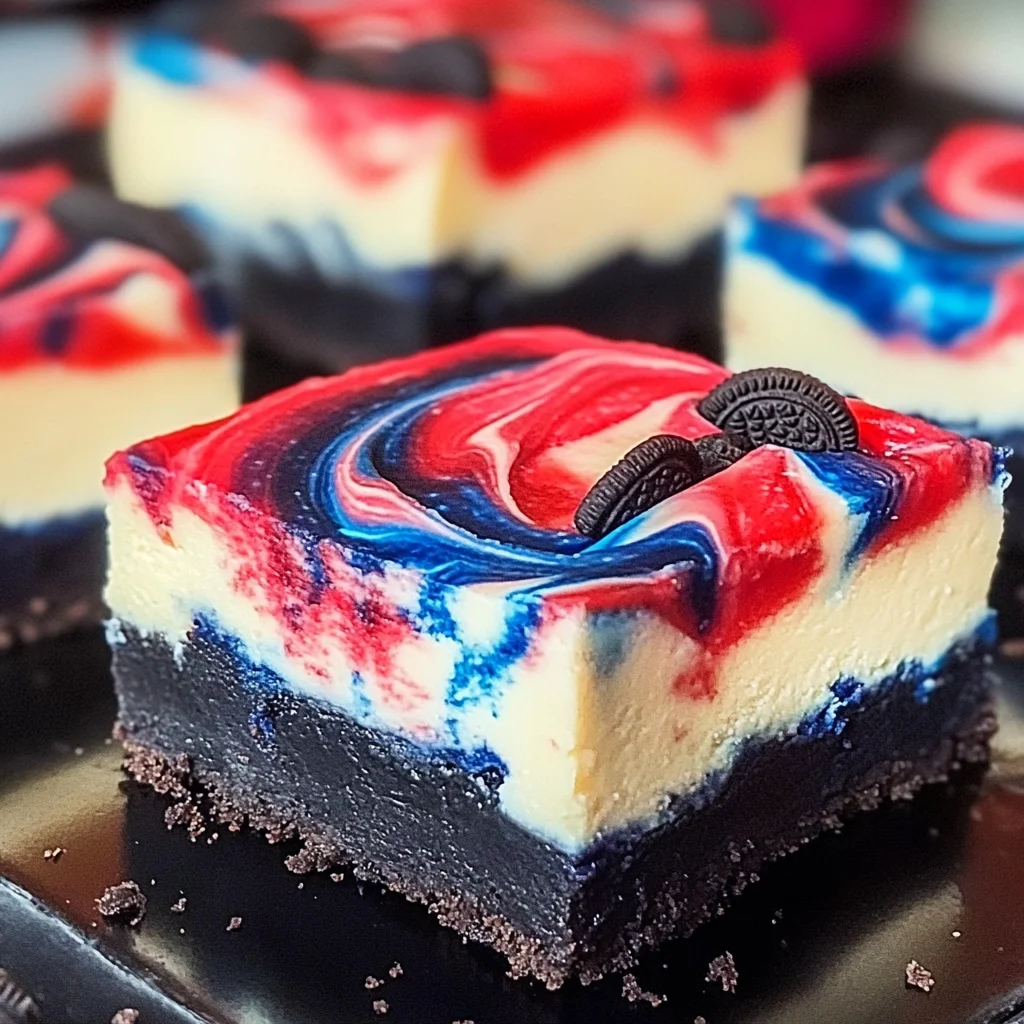
Swirls of colors make these Red White and Blue Cheesecake Bars Recipe a fun dessert to share at holiday BBQs. This super simple red, white, and blue dessert is sure to brighten your Memorial Day and 4th of July picnics. With its vibrant colors and delicious flavors, this cheesecake bars recipe is perfect for any celebration.
Why You’ll Love This Recipe
- Bright and Colorful: The striking red, white, and blue swirls add a festive touch to any gathering.
- Easy to Make: With straightforward steps, even novice bakers can create these stunning bars.
- Perfect for Sharing: Cut into squares, these cheesecake bars are easy to serve at parties or picnics.
- Delicious Flavor: The combination of creamy cheesecake and Oreo crust offers irresistible taste in every bite.
- Versatile Dessert: Ideal for Memorial Day, Fourth of July, or Labor Day celebrations; you can enjoy them year-round!
Tools and Preparation
Before diving into the recipe, gather your tools. Having everything ready will streamline your baking process.
Essential Tools and Equipment
- Food processor
- 9×13 inch baking pan
- Mixing bowls
- Electric mixer
- Rubber spatula
- Wire rack
Importance of Each Tool
- Food processor: Quickly crushes Oreos for the crust, saving time and effort.
- Electric mixer: Ensures smooth and creamy cheesecake batter without lumps.
- Rubber spatula: Perfect for scraping down the sides of bowls and mixing ingredients thoroughly.
Ingredients
Crust Ingredients
- 30 Oreo cookies
- 4 Tablespoons unsalted butter, melted
Cheesecake Filling Ingredients
- 3 – 8 ounce packages cream cheese, softened
- 1 1/2 cups granulated sugar
- 1/4 cup sour cream
- 2 teaspoons vanilla extract
- 1/4 cup all purpose flour
- 3 large eggs
- red & blue gel food colors
How to Make Red White and Blue Cheesecake Bars Recipe
Step 1: Preheat the Oven
Preheat your oven to 325 degrees Fahrenheit. Line a 9×13 inch pan with foil for easy removal later.
Step 2: Prepare the Crust
- Place the Oreo cookies (cream included) in a food processor.
- Pulse until the cookies become fine crumbs.
- Stir in the melted butter until well mixed.
- Press this mixture evenly into the bottom of the prepared pan.
- Bake for about 10 minutes. Remove from oven and let it cool.
Step 3: Prepare the Water Bath
Place a large baking sheet on the bottom rack of the oven. Fill it halfway with water while allowing the oven to preheat again.
Step 4: Mix Cream Cheese Filling
In a large mixing bowl:
Beat the cream cheese with granulated sugar until creamy.
Add sour cream, vanilla extract, and flour; mix again until combined.
Step 5: Add Eggs
Gently add in three large eggs. Beat just until they are mixed into the batter.
Step 6: Color the Batter
Divide the cheesecake batter evenly into three bowls:
Tint two of them with red and blue gel food colors.
Step 7: Layering Colors
Spoon the colored mixtures over the crust in alternating patterns. Use a butter knife to swirl through the batter gently but do not over-mix.
Step 8: Bake
Place your pan on an oven rack above the pan of water. Bake for 45-50 minutes or until set. Once finished, remove from oven immediately and place on a wire rack.
Step 9: Cool Down
Let your cheesecake cool on the counter for one hour before refrigerating it for at least four hours or overnight for best results.
Step 10: Serve
Cut into squares and serve with whipped cream or sprinkles if desired. Enjoy your delicious Red White and Blue Cheesecake Bars!
How to Serve Red White and Blue Cheesecake Bars Recipe
These delightful Red White and Blue Cheesecake Bars are perfect for any celebration. Here are some creative serving suggestions to elevate your dessert experience.
For a Festive Picnic
- Serve these cheesecake bars on a colorful picnic blanket for a vibrant display.
- Pair with fresh berries like strawberries and blueberries for extra color and flavor.
With Whipped Cream
- Top each square with a dollop of whipped cream for added richness.
- Sprinkle some extra red and blue sprinkles on top for a fun touch.
As Party Favors
- Cut the cheesecake into smaller squares and package them in clear bags.
- Tie with red, white, and blue ribbons to make lovely take-home treats.
Alongside Ice Cream
- Serve these bars with a scoop of vanilla or strawberry ice cream.
- The contrast of textures will delight everyone at your gathering.
With Fresh Mint Leaves
- Garnish each serving with fresh mint leaves for a refreshing touch.
- The green adds an attractive pop against the red and blue colors.
How to Perfect Red White and Blue Cheesecake Bars Recipe
To achieve the best results with your Red White and Blue Cheesecake Bars, consider these helpful tips.
- Use room temperature ingredients: Ensure your cream cheese and eggs are at room temperature for a smoother batter.
- Don’t overmix the batter: Gently combine ingredients to keep the texture light and fluffy.
- Create even layers: Use a measuring cup to pour the colored batters evenly over the crust for uniformity.
- Chill before serving: Refrigerate the cheesecake bars for at least 4 hours to enhance the flavors.
- Check doneness carefully: Look for slight jiggles in the center; they will firm up as they cool.
- Slice with a hot knife: Dip your knife in hot water before cutting for clean edges.
Best Side Dishes for Red White and Blue Cheesecake Bars Recipe
Complement your Red White and Blue Cheesecake Bars with these tasty side dishes that make great pairings.
- Grilled Corn on the Cob: Sweet corn brushed with butter is a classic summer favorite.
- Caprese Salad: Fresh mozzarella, tomatoes, and basil drizzled with balsamic glaze add brightness to your meal.
- Fruit Salad: A mix of seasonal fruits provides freshness that balances out the richness of the cheesecake bars.
- BBQ Chicken Skewers: Tender chicken pieces grilled to perfection offer a savory contrast to sweet desserts.
- Potato Salad: Creamy potato salad brings comfort food vibes, making it an excellent picnic companion.
- Veggie Platter: Crisp vegetables served with ranch dip provide crunchiness that complements the creamy cheesecake bars.
Common Mistakes to Avoid
When making the Red White and Blue Cheesecake Bars Recipe, it’s easy to make a few common errors. Here are some tips to ensure your dessert turns out perfectly.
- Using cold cream cheese: Always soften your cream cheese before mixing. Cold cream cheese can lead to lumps in your batter.
- Overmixing the batter: Mix just until combined. Overmixing can incorporate too much air and cause cracking during baking.
- Skipping the water bath: The water bath helps create a moist environment, preventing cracks. Don’t skip this crucial step!
- Not cooling before chilling: Allow the cheesecake to cool completely before refrigerating. This helps set the texture properly.
- Cutting too soon: Be patient and let the bars chill for at least 4 hours before cutting. This helps them hold their shape.
Storage & Reheating Instructions
Refrigerator Storage
- Store in an airtight container for up to 5 days.
- Ensure it is completely cooled before sealing to avoid condensation.
Freezing Red White and Blue Cheesecake Bars Recipe
- Freeze for up to 2 months in a freezer-safe container.
- Wrap tightly in plastic wrap and then foil for best results.
Reheating Red White and Blue Cheesecake Bars Recipe
- Oven: Preheat to 350°F and warm for about 10-15 minutes. This will help revive the texture.
- Microwave: Use a microwave-safe plate and heat in 15-second intervals until warmed through.
- Stovetop: Place in a non-stick skillet over low heat, cover, and warm gently for a few minutes.
Frequently Asked Questions
Here are some frequently asked questions about the Red White and Blue Cheesecake Bars Recipe.
Can I use different colors for the cheesecake?
Yes! You can customize the colors based on your celebrations or preferences. Use any gel food colors you like.
How long do these cheesecake bars last?
When stored properly in the refrigerator, they can last up to 5 days. For longer storage, consider freezing them.
Can I make this recipe gluten-free?
Absolutely! Substitute Oreos with gluten-free cookies and ensure all other ingredients are gluten-free.
What should I serve with these cheesecake bars?
These delicious bars pair well with whipped cream, fresh berries, or even a drizzle of chocolate sauce for extra flair.
Is there an alternative crust option?
Yes! Instead of Oreos, you can use graham crackers or any cookie of your choice for a different flavor profile.
Final Thoughts
The Red White and Blue Cheesecake Bars Recipe is not only visually stunning but also incredibly delicious. Perfect for summer holidays like Memorial Day and Fourth of July, these bars are sure to impress your guests. Feel free to customize with different colors or toppings to match any occasion!
Red White and Blue Cheesecake Bars Recipe
Experience the joy of summer celebrations with our delightful Red White and Blue Cheesecake Bars Recipe. This vibrant dessert features eye-catching swirls of red and blue, making it a perfect addition to your Memorial Day and Fourth of July picnics. With a creamy cheesecake filling atop an easy Oreo crust, these bars are not only visually stunning but also packed with flavor. They are simple to prepare, making them ideal for novice bakers and seasoned pros alike. Serve them chilled at your next gathering, cut into squares for easy sharing, and watch your guests rave about this festive treat!
- Prep Time: 20 minutes
- Cook Time: 50 minutes
- Total Time: 1 hour 10 minutes
- Yield: About 15 servings 1x
- Category: Dessert
- Method: Baking
- Cuisine: American
Ingredients
- 30 Oreo cookies
- 4 tablespoons unsalted butter, melted
- 3 (8-ounce) packages cream cheese, softened
- 1 1/2 cups granulated sugar
- 1/4 cup sour cream
- 2 teaspoons vanilla extract
- 1/4 cup all-purpose flour
- 3 large eggs
- Red & blue gel food colors
Instructions
- Preheat oven to 325°F. Line a 9×13 inch baking pan with foil.
- In a food processor, crush Oreo cookies into fine crumbs. Mix with melted butter and press into the bottom of the prepared pan. Bake for 10 minutes; cool.
- Prepare a water bath by placing a large baking sheet on the lower rack filled halfway with water.
- In a mixing bowl, beat cream cheese and sugar until smooth. Add sour cream, vanilla, and flour; mix until combined.
- Gently add eggs one at a time until just mixed in.
- Divide batter into three bowls; tint two portions with red and blue gel food colors.
- Spoon colored batters over the crust in alternating patterns; swirl lightly with a knife.
- Place in the oven above the water bath; bake for 45-50 minutes until set. Cool for one hour before refrigerating for at least four hours or overnight.
- Cut into squares and serve.
Nutrition
- Serving Size: 1 serving
- Calories: 280
- Sugar: 21g
- Sodium: 200mg
- Fat: 18g
- Saturated Fat: 10g
- Unsaturated Fat: 7g
- Trans Fat: 0g
- Carbohydrates: 27g
- Fiber: 1g
- Protein: 4g
- Cholesterol: 80mg
Leave a Comment