
Cheesy Halloween Pizza Skulls are a delightfully spooky treat perfect for parties, family gatherings, or a fun Halloween night in. These fun and flavorful pizzas not only look great but also provide an interactive cooking experience for kids and adults alike. Their cheesy goodness and playful presentation make them a standout feature on any Halloween table!
Why You’ll Love This Recipe
- Easy to Make: With simple ingredients and straightforward steps, these pizza skulls are perfect for cooks of all levels.
- Kid-Friendly Fun: Engage your little ones in the kitchen as they help shape and fill the skulls with their favorite toppings.
- Customizable: Personalize each skull with different cheeses, meats, or veggies to suit everyone’s tastes.
- Perfect for Parties: Serve these Cheesy Halloween Pizza Skulls at your next gathering, and watch them vanish quickly!
- Spooky Presentation: The unique skull shape adds a fun twist that will impress your guests and make your Halloween celebration memorable.
Tools and Preparation
Before diving into this delicious recipe, gather the necessary tools to ensure a smooth cooking process.
Essential Tools and Equipment
- Baking sheet
- Oven mitts
- Rolling pin
- Skull-shaped cookie cutter
Importance of Each Tool
- Baking sheet: Provides a flat surface for cooking multiple pizza skulls at once.
- Oven mitts: Keep your hands safe from hot surfaces when handling the baking sheet.
- Rolling pin: Helps roll out dough evenly for consistent pizza shapes.
- Skull-shaped cookie cutter: Creates the iconic shape that makes these pizzas festive and fun.
Ingredients
For the Dough
- 2 cups all-purpose flour
- 1 packet instant yeast
- 1 teaspoon salt
- ¾ cup warm water
For the Filling
- 1 cup shredded mozzarella cheese
- ½ cup pizza sauce
- ½ cup sliced pepperoni
- ¼ cup chopped bell peppers
For Topping
- Extra mozzarella cheese for sprinkling
- Olive oil for brushing
How to Make Cheesy Halloween Pizza Skulls
Step 1: Preheat the Oven
Preheat your oven to 425°F (220°C) to ensure it’s hot enough for baking crispy pizza skulls.
Step 2: Prepare the Dough
- In a large bowl, combine the flour, instant yeast, and salt.
- Gradually add warm water while mixing until a dough forms.
- Knead the dough on a floured surface for about 5 minutes until smooth.
Step 3: Roll Out the Dough
Using a rolling pin, roll out the dough to about ¼ inch thick. Cut out skull shapes using your cookie cutter.
Step 4: Assemble Your Skull Pizzas
- Place half of the skull cutouts on a baking sheet lined with parchment paper.
- Spread a spoonful of pizza sauce on each cutout.
- Add shredded mozzarella cheese, pepperoni slices, and bell peppers as desired.
- Top with another skull cutout and pinch the edges to seal.
Step 5: Bake the Pizza Skulls
Brush each pizza skull with olive oil and sprinkle extra mozzarella cheese on top. Bake in the preheated oven for 15-20 minutes or until golden brown.
Step 6: Serve and Enjoy!
Once baked, let them cool slightly before serving. Enjoy your spooky Cheesy Halloween Pizza Skulls with friends and family!
How to Serve Cheesy Halloween Pizza Skulls
Cheesy Halloween Pizza Skulls are a fun and spooky treat perfect for Halloween gatherings. They can be served in various creative ways to enhance the festive spirit.
Creative Serving Ideas
- On a themed platter: Arrange the pizza skulls on a black or orange platter for a festive look.
- With dipping sauces: Serve with marinara, ranch, or garlic dipping sauces for added flavor.
- As part of a buffet: Include them in a Halloween-themed buffet alongside other spooky snacks.
- In individual portions: Place each skull in cupcake liners for easy serving at parties.
Fun Presentation Tips
- Garnished with herbs: Sprinkle fresh parsley or basil around the pizza skulls for color.
- Accompanied by spooky decorations: Use fake spiders or cobwebs around the serving area to set the mood.
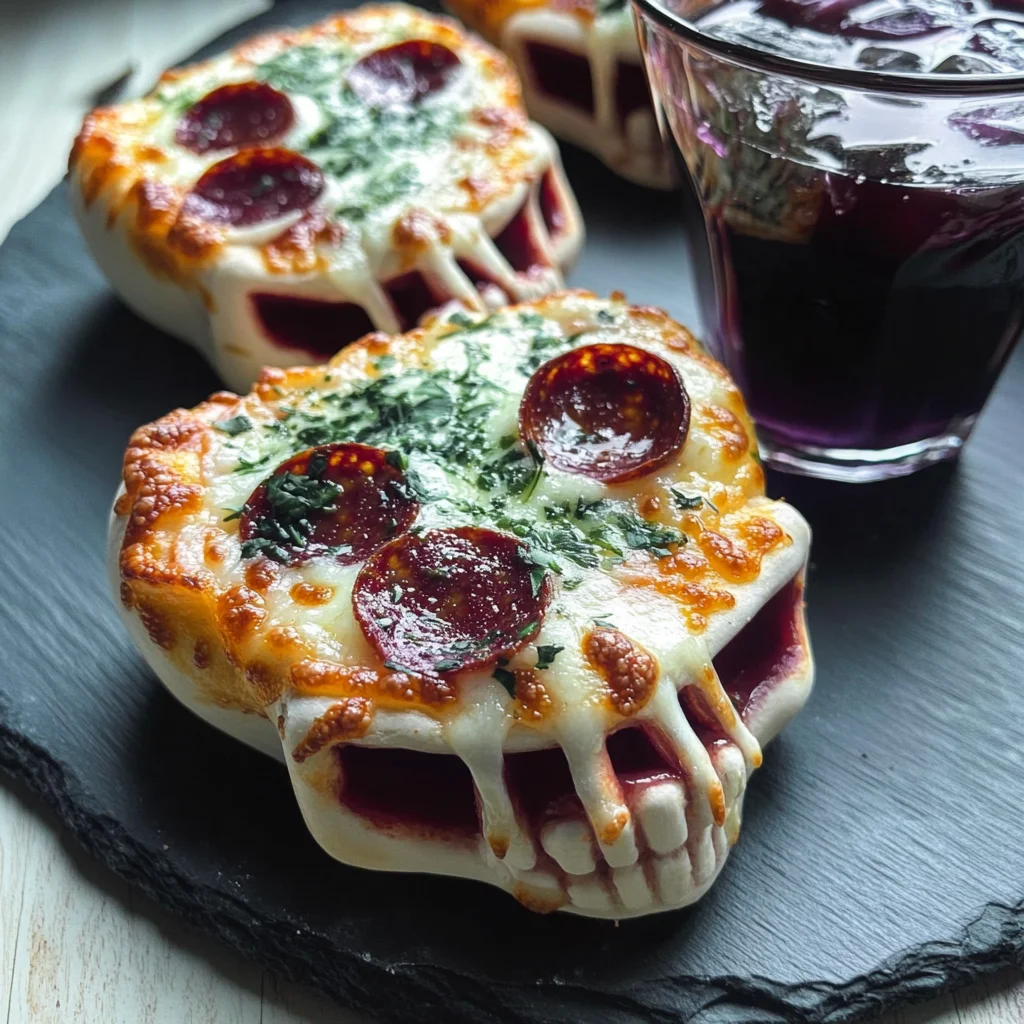
How to Perfect Cheesy Halloween Pizza Skulls
To ensure your Cheesy Halloween Pizza Skulls turn out great, consider these helpful tips.
- Use fresh ingredients: Fresh cheese and toppings enhance flavor and texture.
- Don’t overfill: Be careful not to overstuff the skulls; this prevents spills during baking.
- Chill before baking: Refrigerate the assembled skulls for about 30 minutes; this helps maintain their shape.
- Experiment with cheeses: Try mixing different types of cheese for unique flavors.
- Keep an eye on baking time: Ovens vary; monitor closely to avoid burning.
Best Side Dishes for Cheesy Halloween Pizza Skulls
Pairing side dishes with your Cheesy Halloween Pizza Skulls can elevate your meal. Here are some great options to consider.
- Crispy Garlic Bread: A perfect complement, it adds crunch and flavor alongside the pizza skulls.
- Veggie Platter: Fresh vegetables like carrots, celery, and bell peppers offer a crisp contrast.
- Pumpkin Soup: A warm bowl of pumpkin soup keeps with the fall theme and adds comfort.
- Spooky Salad: Create a salad using dark leafy greens topped with orange bell peppers and black olives.
- Chips and Salsa: A crunchy side that pairs well with cheesy flavors while adding some spice.
- Fruit Skewers: Colorful fruit skewers add a sweet touch and can be decorated to look festive.
Common Mistakes to Avoid
Making Cheesy Halloween Pizza Skulls can be fun, but there are common pitfalls to watch out for.
- Ignoring dough thickness: If your dough is too thick, it won’t cook properly. Aim for a uniform thickness of about 1/4 inch.
- Overfilling the skulls: Stuffing too much filling can lead to messy pizza skulls. Use just enough cheese and toppings to allow for expansion.
- Not sealing edges well: If the edges aren’t sealed properly, your filling may leak out. Pinch the edges tightly to ensure a good seal.
- Using low-quality cheese: Poor quality cheese may not melt well and can affect flavor. Choose a good melting cheese for the best results.
- Skipping preheating the oven: Baking in an unheated oven can result in uneven cooking. Always preheat your oven before baking.
Storage & Reheating Instructions
Refrigerator Storage
- Store in an airtight container for up to 3 days.
- Allow the pizza skulls to cool completely before refrigerating.
Freezing Cheesy Halloween Pizza Skulls
- Wrap each skull tightly in plastic wrap and then in foil for up to 2 months.
- Label with the date so you can keep track of freshness.
Reheating Cheesy Halloween Pizza Skulls
- Oven: Preheat your oven to 350°F (175°C) and bake for about 10-15 minutes until heated through.
- Microwave: Heat on medium power for 1-2 minutes, checking regularly to avoid sogginess.
- Stovetop: Place in a skillet over low heat, covering it with a lid, and warm for about 5-7 minutes.
Frequently Asked Questions
Here are some common questions about making Cheesy Halloween Pizza Skulls.
Can I customize the fillings in Cheesy Halloween Pizza Skulls?
Yes! Feel free to add your favorite toppings like pepperoni or vegetables according to your taste.
How do I know when my Cheesy Halloween Pizza Skulls are done?
They should be golden brown on top and feel firm when touched. A toothpick inserted should come out clean.
What kind of cheese is best for Cheesy Halloween Pizza Skulls?
Melted mozzarella or cheddar works wonderfully, but you can mix different cheeses for more flavor.
Are Cheesy Halloween Pizza Skulls suitable for kids?
Absolutely! They are fun to make and eat, making them perfect for children during Halloween celebrations.
Final Thoughts
Cheesy Halloween Pizza Skulls are not only spooky but also deliciously cheesy and versatile. You can easily customize them with various fillings to suit your taste preferences. Try making this festive treat at home; it’s sure to delight both kids and adults alike!
Cheesy Halloween Pizza Skulls
Cheesy Halloween Pizza Skulls are the ultimate spooky treat for your Halloween festivities! These fun and interactive pizzas make an exciting activity for kids and adults alike, allowing everyone to customize their own cheesy skulls with a variety of toppings. Their eye-catching shape and gooey cheese filling will not only impress your guests but also vanish quickly from your party table. Perfect for Halloween gatherings, these delightful pizza bites combine the joy of cooking with the thrill of a haunted celebration. Get ready to bake a batch that’s sure to be a hit this season!
- Prep Time: 20 minutes
- Cook Time: 20 minutes
- Total Time: 40 minutes
- Yield: Approximately 8 servings 1x
- Category: Appetizer
- Method: Baking
- Cuisine: American
Ingredients
- 2 cups all-purpose flour
- 1 packet instant yeast
- 1 teaspoon salt
- ¾ cup warm water
- 1 cup shredded mozzarella cheese
- ½ cup pizza sauce
- ½ cup sliced pepperoni
- ¼ cup chopped bell peppers
- Extra mozzarella cheese for topping
- Olive oil for brushing
Instructions
- Preheat oven to 425°F (220°C).
- Combine flour, yeast, and salt in a bowl; gradually add warm water until dough forms.
- Knead on a floured surface for about 5 minutes until smooth, then roll out to ¼ inch thickness.
- Cut out skull shapes using a cookie cutter.
- On half of the cutouts, spread pizza sauce, add mozzarella, pepperoni, and bell peppers. Top with another cutout and pinch edges to seal.
- Brush with olive oil and sprinkle extra cheese before baking for 15-20 minutes until golden.
Nutrition
- Serving Size: 1 pizza skull (100g)
- Calories: 270
- Sugar: 2g
- Sodium: 560mg
- Fat: 12g
- Saturated Fat: 6g
- Unsaturated Fat: 4g
- Trans Fat: 0g
- Carbohydrates: 30g
- Fiber: 2g
- Protein: 10g
- Cholesterol: 20mg
Leave a Comment